Ubuntu Home Server II
In the last article, I picked some components to build my Ubuntu Development Server. Now, it's time to put the pieces together. For the benefit of those who may not have built a computer before, I'm going to run through it step by step.
Instructions
- Take the sides of the case off. You'll probably have to remove some screws in the back of the case first, then the panels should slide off. On this case, they slide to the back.
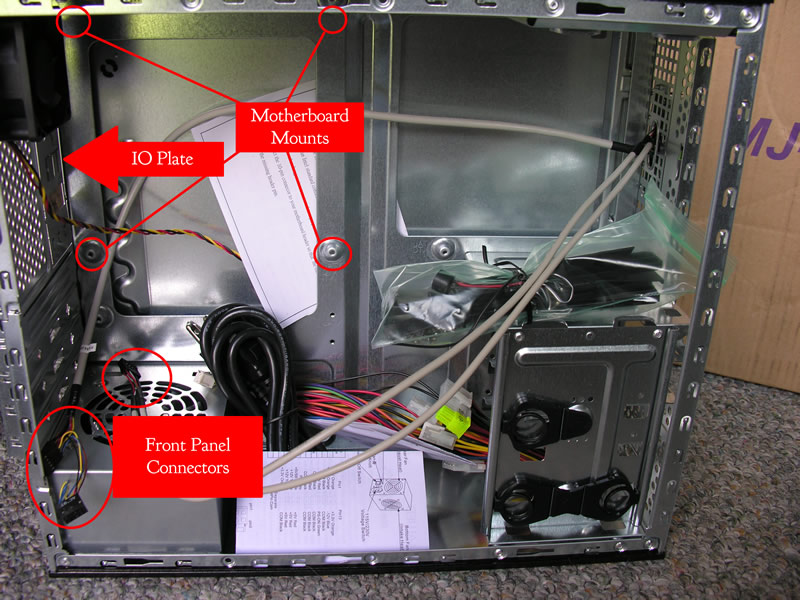
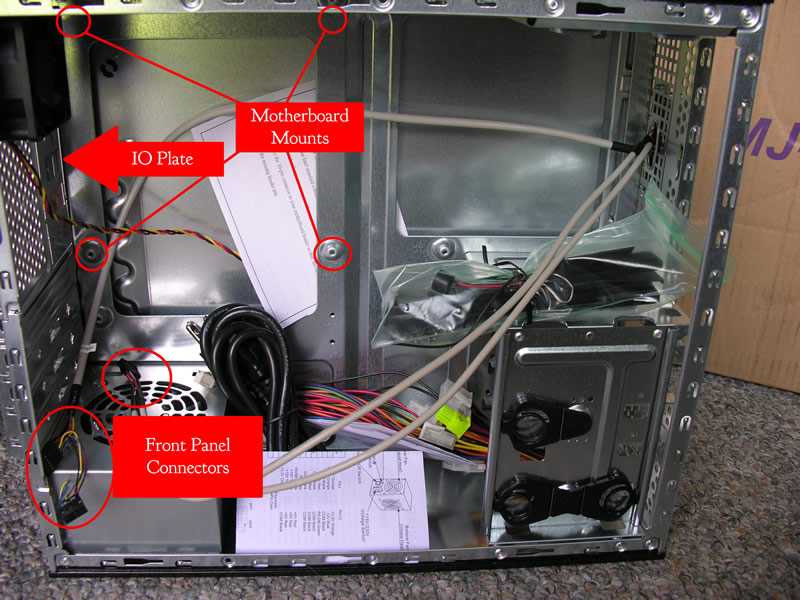
- Take out the IO plate that comes with the case (the piece that all the connectors on the back of the motherboard poke through). Find the new one that comes with the motherboard, and pop it into place. Make sure that you put it in the right way. Match it up with the motherboard before you put it in just to be sure.
- Take all the loose stuff out of the case and lay it on its side on a clean work area. You're going to install the motherboard, but before you start touching any components, get rid of static electricity on your body. Invest in an anti-static wrist band you can get for $5 at Radio Shack.
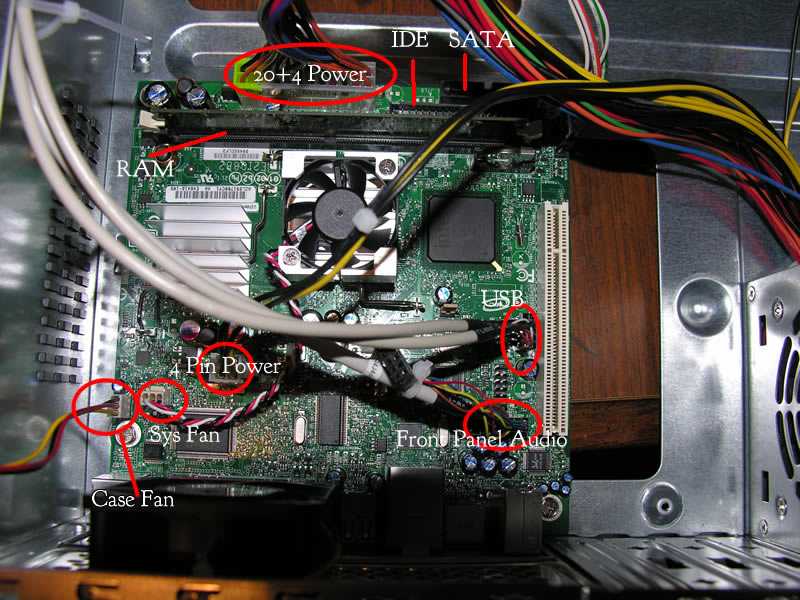
- Lay the motherboard on top of its anti-static bag on the table and take the RAM out of its case. Find the memory slot at the back of the board. Pull the two clips back, line the notch in the memory chip up with the notch in the ram slot, and RAM it home. Haha, that's some bad geek humor. Just push gently until you hear both clips snap into place. It takes a lot of pressure, but if it doesn't seem to be going, stop and make sure you've got it right.
- Find the cable coming out of the fan on the motherboard (this sits on top of the Northbridge) and plug it into the 3 pin connector labeled sys_fan, which is right next to the northbridge.
- Now, pick up the motherboard. It's not as fragile as you think, just don't drop it. Place it in the case so that it is resting on the motherboard mounts (little humps in the case wall) with the ports poking through the IO shield you put in earlier. Make sure everything lines up through the IO shield, then find the screws that came with the board (there should be 4). Screwing this motherboard down is a pain, because it doesn't want to stay put. You have to push it into the IO shield, then get the screw in place and screw it in, which takes 4 hands at best. Better grab a friend to help. Anyway, get all 4 screws in.
- With the board in place, it is time to plug in the cables in the case to the motherboard. Find the USB cable, find a USB header (They're marked in big letters on the Atom board), and connect them, making sure to line up the missing pin in the header with the missing pin on the cable. Connect the front panel audio line to its header as well. Now, you'll need to tackle the power buttons and lights, which are a pain. This is not a simple connector, but rather a group of single and double pin connectors you have to plug into the correct pins on the board. Rather than try and sort it out here, I'll just tell you to look at the large diagram that comes with the motherboard. Pay close attention to positive and negative. I accidentally reversed the positive and negative power switch connectors and spent almost an hour wondering why it wouldn't start up. Last but not least, take the cable that comes out of the rear case fan (it's a 3 pin connector) and find the case fan connector on the board. Line it up and plug it in.
- Time to check your work. If you've followed all the steps above, find the power cord that comes with the case and plug it into the wall. Make sure you don't have your hands or face inside the case (just don't touch anything that might shock you), and plug it into the power supply.
- If you've reversed the positive and negative power switch, you'll hear things turn on immediately, then go dead a few seconds later. Unplug the power and fix it. If you don't hear anything, good. There is a green or red power LED on the board. With the power plugged in but the computer off, you should be able to see it lit up. If you don't see that on, unplug and check both of your power connections. If the LED is on, the last step is to push the power button (on the APEX it is the far right one), and cross your fingers. You should hear fans, a beep, then it should keep going. If you've got that, then shut it back off by pressing the power button again. If not, it's time to consult Google or your parts supplier.
- Last but not least, we need to install our storage. The APEX case has space for several (I think 4) drives. We only need one for the boot drive and one for the data drive. Remove the quick clips on the drive cage by twisting them and pulling. I hate those things, so I threw mine out.
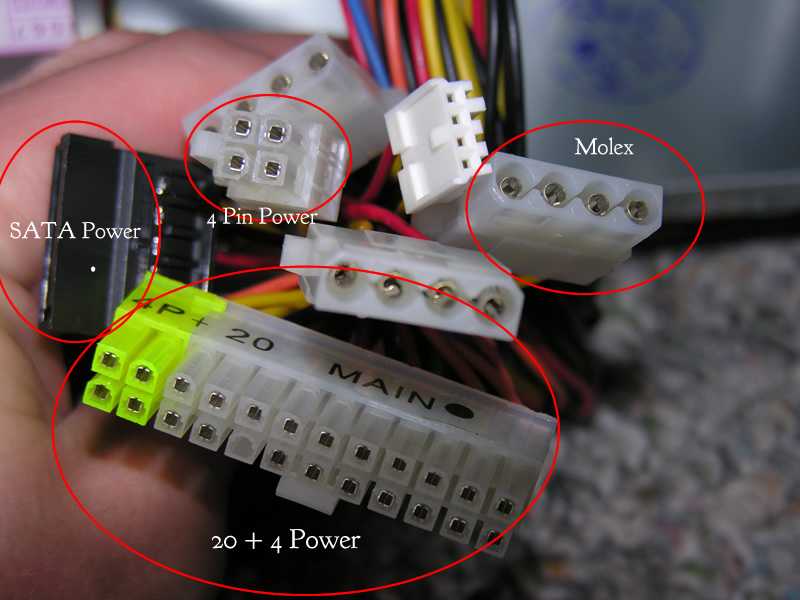
- For IDE Drives, like the one I used for a boot drive: The IDE connector is the long connector with 2 rows of pins that should be labeled IDE. Plug in an IDE ribbon cable or better yet an IDE round cable to the board. Next, find a free 4 pin rectangular (MOLEX) power connector coming out of the power supply, and pull it to the side.
- For SATA Drives, like the one I used for a data drive: Find the SATA connectors. There are two of them on the Atom board, and they are small, rectangular connectors with sort of an S shape inside. Plug a SATA cable into one of them. Next, find a SATA power connector (it's got a wide, thin male piece) coming out of the power supply and pull it to the side.
- Slide whatever drives you are using into the drive cage with the connections facing the back of the cage. It's up to you how you secure the drives. You can use the quick clips, or you can screw them in like a real man would. Either way, make sure they are secure, as vibration is the leading cause of drive failure.
- Time to plug in. Pull out whatever data connectors you plugged into the board earlier (SATA or IDE) and plug them into the back of the drives. It should be pretty easy to tell where they go. With SATA it can be a little tricky, because the connectors are small and hard to see. Finally, pull out the power connectors you separated earlier (SATA or MOLEX), and plug those into the back of the drives as well. If you've got multiple IDE drives, you might have to mess with the jumper settings too, but if you've only got one IDE drive or no IDE drives, don't worry about it.
- Plug it in again, and if you've got a monitor handy, use that to check what it says when it boots up. The BIOS should go into a short cycle of detecting the drives, then you should get an error message because you have nothing to boot from yet. Congratulations, you just built a working computer.